There is a lot of benefit of using network drive because friends, co-workers etc can easily share the files or data on the go without waiting and the administrators can regulate who can access the network drive. So without wasting any time let’s see How to Map Network Drive in Windows 10 with the help of the below-listed troubleshooting guide.
2 Ways To Map Network Drive in Windows 10
Make sure to create a restore point, just in case something goes wrong.
2 Ways To Map Network Drive in Windows 10 Method 1: Map Network Drive using File Explorer Method 2: Map Network Drive using Command Prompt
Method 1: Map Network Drive using File Explorer
1.Press Windows Key + E to open File Explorer, make sure to navigate to File Explorer. 2.From the ribbon menu, click on Computer.
3.Then click on Map Network Drive under Network. 4.Select the drive letter you want to use for the network folder, then click Browse.
5.Navigate to the folder which you want to map then click OK.
6.Now click Finish in order to complete the process. 7.This mapped network drive will appear in This PC and if you want to remove this drive, simply right-click on the drive and select Disconnect.
Method 2: Map Network Drive using Command Prompt
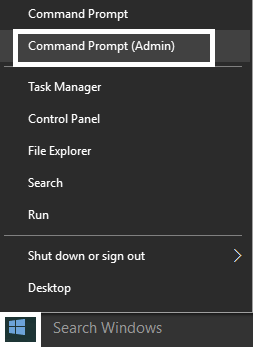
1.Press Windows Key + X then select Command Prompt (Admin).
2.Type the following command into cmd and hit Enter: net use x: /persistent:yes \servernameshare
Note: Replace x: with the drive letter you want to assign. 3.Also, if you want to use username & password then use the following command: net use x: \servername\sharename /user username password
4.Now in order to make this connection to the shared folder permanent i.e. the network drive stays even after a restart, you need to use the following command: net use x: /persistent:yes \servername\sharename /user username password
5.In future, if you want to delete a particular mapped network drive or delete all of the mapped network drives use the following commands: net use x: /delete (For deleting a particular mapped network drive with letter x) net use * /delete (For deleting all of the mapped network drives)
Recommended:
Fix DISM Source Files Could not be Found Error How to Fix DISM Error 0x800f081f in Windows 10 Fix Task Host Window Prevents Shut Down in Windows 10 Fix Mouse Pointer Lags in Windows 10
That’s it you have successfully learned How to Map Network Drive in Windows 10 but if you still have any questions regarding this post then feel free to ask them in the comment’s section.


